Adding discounts
In Beeyond, discounts can be created and then processed by the POS systems.
A discount can be linked to multiple articles.
Within a product, the sub-tab ‘Article Discount’ is also visible.
Here, existing promotions can be linked or new ones can be created.
It’s also possible to create a discount via: Data > Entities > Article Discount.
Adding a discount can be done by clicking the ‘Add’ icon.

The field Active is a system field and is set to ‘yes’ by default. It should not be changed.
The Active (<location>) fields determine where the discount is active.
If these are not selected, the discount will not be available at that location.
Under LOCATION CHECK, you can see if a location has been selected.
The Active (<location>) fields determine where the discount is active.
If these are not selected, the discount will not be available at that location.
Under LOCATION CHECK, you can see if a location has been selected.
The next screen allows you to enter the discount details. Fields marked with a
The fields Active (TT), Active (Tica), Active (FE), and Active (Belsele) determine to which locations the discount should be sent.
The end date is inclusive, meaning the discount remains valid up to and including the entered end date.
So for example, if 31 December 2019 is the end date, the discount is not active on 1 January 2020.
! are mandatory.The fields Active (TT), Active (Tica), Active (FE), and Active (Belsele) determine to which locations the discount should be sent.
The end date is inclusive, meaning the discount remains valid up to and including the entered end date.
So for example, if 31 December 2019 is the end date, the discount is not active on 1 January 2020.

TIP | You can use one article discount for multiple articles.
There are 4 types of discounts available in Beeyond. Depending on the type selected, different fields will be shown:
Discount – % per x items (Price Reduction)
→ A percentage discount for all linked articles, applied per the entered quantity.
Discount – Price per x items (Price Reduction)
→ A fixed price for all linked articles, applied per the entered quantity.
Discount – % from x items (Tiered Discount)
→ A percentage discount for all linked articles, valid from the entered quantity onwards.
Discount – Price from x items (Tiered Discount)
→ A fixed price for all linked articles, valid from the entered quantity onwards.
Important Notes When Using Discounts in Beeyond
- A location must always be selected.
- A discount is sent to the POS once only.
- So make sure the articles are added to the discount group on the same day.
- If there’s too much delay, set the end date to today to trigger a refresh — then move the end date back if needed.
- Articles created after linking the discount must be added to a new discount group.
- Adding them to an existing group does not work.
- Removing articles from a discount (unlinking) does not sync to the POS.
- Once activated, only the start and end date can be changed.
- The end date is inclusive.
- The end date can only be changed to tomorrow or later.
- A newly created discount must have a start date of tomorrow or later.
- A start date of today or in the past will not work.
- If you want different discounts for different locations:
- First create the discounts, then assign articles to each one.
- To deactivate a discount for a location, simply uncheck that location in the discount.
- The change takes effect at the POS in 1–2 hours.
From 1 item: 10% discount
Select type: Discount – % per x items (Price Reduction)
Set quantity to 1 and discount to 10.00%
Example 2
When sold in sets of 5: €12.50 per item
Select type: Discount – Price per x items (Price Reduction)
Set quantity to 5 and price to 12.50
Example 3
From 2 items: 10% discount
Select type: Discount – % from x items (Tiered)
Set quantity to 2 and discount to 10.00%
Example 4
From 2 items: €12.50 per item
Select type: Discount – Price from x items (Tiered)
Set quantity to 2 and price to 12.50
Click ‘Save’ or ‘Save and Close’ to link the discount to the product.
Then click ‘Save and Close’ again to save the product itself.
Please note: You cannot change the discount type afterward.
To add an existing discount to a product:
Edit the product → Uncheck "Only show related rows" → Search for the discount (e.g. by typing in the "Promotion Description" column).
Select the discount by checking the "Relation" box in the row.
Linking multiple products to the same discount
•Select the products
• Choose Bulk Update 
• Click Next 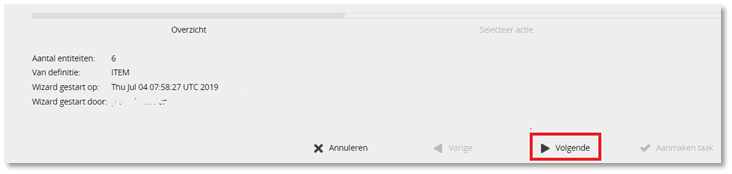
• Select ‘Add and Replace Relations’ → then click Next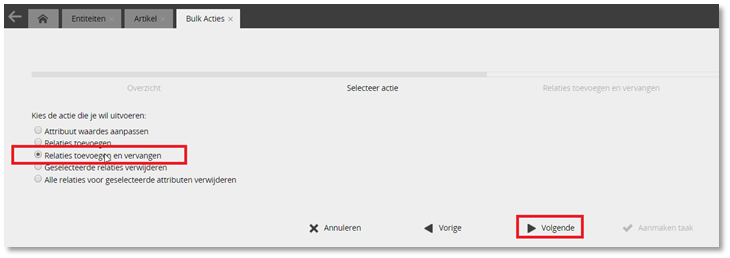
• Select the correct Article Discount by checking the "Relation" box → click Next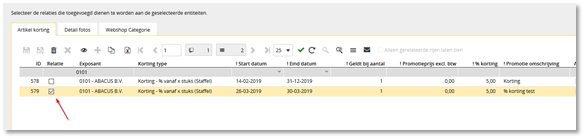
• Review how many products (entities) will be updated. If correct, click ‘Create Task’.
Please note: You cannot unlink a product from an article discount after it has been linked.
Related Articles
Adding a product to Beeyond old method
New exhibitors and existing exhibitors who have been notified must use data.tica.nl, the TICA Product Upload System, where they must upload product data and create new products. (These exhibitors can no longer add products in Beeyond via the plus ...Requirements product data
What requirements must the product data meet? The following mandatory fields must be provided: Exhibitor number Your article number Barcode (if applicable) Label / cash register description Label Sales price excl. VAT VAT Active Venlo Active Aalsmeer ...